photoedit
tutorial on editing photo using photoshop, coral draw, photoscape or other available photo edit software
Saturday, February 5, 2011
Sunday, January 16, 2011
How to Make Lens Flare by Using Adobe Photoshop CS4
Hello and welcome....
Today I will teach you on how to make your image of your picture have some shiny effect which what we called lens flare. For today tutorial DSLR_101/2 we will using very simple step using Adobe Photoshop CS4.
Open AP CS4>Open picture file>Select picture>Filter>Render>Lens Flare
You can choose between 4 different type of lens flare
Change the brightness to obtain the batter flare
Here is couple picture which I transform using this method
Enjoy n try it by yourself
Today I will teach you on how to make your image of your picture have some shiny effect which what we called lens flare. For today tutorial DSLR_101/2 we will using very simple step using Adobe Photoshop CS4.
Open AP CS4>Open picture file>Select picture>Filter>Render>Lens Flare
You can choose between 4 different type of lens flare
Change the brightness to obtain the batter flare
Here is couple picture which I transform using this method
 |
| Before |
 |
| After |
 |
| Before |
 |
| After |
Before |
 |
| After |
Enjoy n try it by yourself
Wednesday, January 12, 2011
How to Edit Your Passport Picture
Welcome to DSLR_101. Hye! my name is Farid. First an fore more I would like to welcome you all to my blog. For today lesson I would like to teach you how to make batter profile picture for your resume. I will used two different software which is CorelDRAW 12 and Photoscape.
 |
| Before |
 |
| After |
Here is two of my picture before and after editing.
Step 1
Simply find any formal attire on the internet, and then open your CorelDRAW 12. Drag both your picture and
formal attire picture. Double click on your picture to edit on another page. If nothing happen, just click on Bitmap>convert to Bitmap.
Step 1
Simply find any formal attire on the internet, and then open your CorelDRAW 12. Drag both your picture and
formal attire picture. Double click on your picture to edit on another page. If nothing happen, just click on Bitmap>convert to Bitmap.
Step 2
Click on magic wand and also select subtractive mode and apply the magic wand for the unwanted portion of the picture. Close the page and click ok
 |
Crop the picture around the neck, so it cal look fit to the coat. Click on shape tool.

 |
| Shape tool |
Step 4
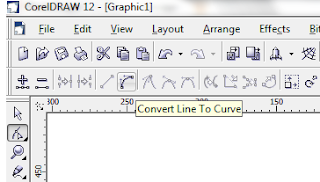
Edit the neck by simply click on the line. You can move the button to crop around the neck. To make it more curve just click on small rectangular and then click on convert line to curve.

Step 5
Now your picture are nearly finish. Then click File>Export>150dpi>ok.....save your picture as jpeg format.
Step 6
To enhance your picture just open Photoscape software.
Click on Filter>Cinema>Agfa>Vignetting....then save
Subscribe to:
Posts (Atom)


